You could spend hundreds of dollars on lights from a
photography store and it might be worth it.
Or you could start out cheap. A
cheap approach is to use inexpensive shop lights from Home Depot, Lowes, or
another hardware store. Ones with about
a 10-inch dish and a simple clamp. They’re
about 10 bucks. I think a big consideration is whether you are going to
be junking up your living room with ugly shop lights on cheap stands. If you have a dedicated studio, then go
cheap.
If you are shooting in a room where you will also have natural
light coming in, you want to choose compact fluorescent bulbs that are “daylight
balanced”. If you are using entirely
artificial lighting, then this is less important. Either way, buy the same kind of bulbs with
the same “color temperature rating” from the same company for all your lights so you don’t get
strange colored shadows.
You probably will want to diffuse the light. One possibility is photographic
umbrellas (picture at bottom). Or you could get diffusion
material and some clothes pins. Diffusion
material, which you can find on amazon, is resistant to fire, which is
important. There are tons of white
things you can put in front of a light, but many of them might catch on fire
eventually. Be safe.
(Amanda 36c tells how to make a light diffuser on her blog here and she has a very nice entry on lighting placement.)
(Amanda 36c tells how to make a light diffuser on her blog here and she has a very nice entry on lighting placement.)
Arranging your lights properly is real helpful. A common set-up for video is called Three
Point Lighting. It is simple yet versatile. In Three Point Lighting, you use
three lights, called the key light, the fill light and back light.
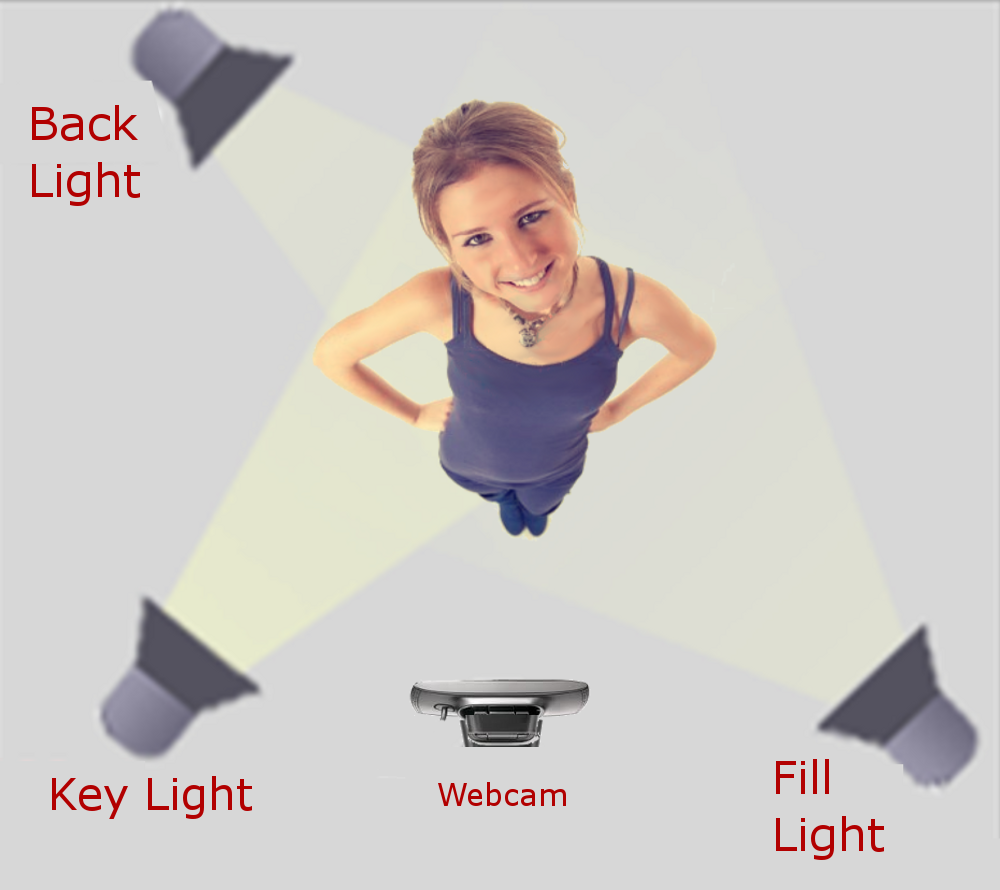
Key Light
This is the main light. It is usually the strongest and has
the most influence on the look of the scene. It is placed to one side of the
camera and model so that this side is well lit and the other side has some
shadow. For the key light, I might use a
shop bulb (300 Watt equivalent compact fluorescent bulbs) mounted on a stand
with a photographic white umbrella or something else in front of the light to
diffuse it. Ideally the light should be
high enough up to shine down on the model at about a 45 degree angle.
Fill Light
This is the secondary light and is placed on the opposite
side of the key light. It is used to fill in the shadows created by the key.
The fill light is usually softer and less bright than the key. To achieve this,
you can move the fill light further back or use more diffusion. You might also
want to set the fill light to more of a wide light (flood) than the key light. Like the key light, I also use a shop bulb (300
Watt equivalent compact fluorescent bulbs) with a photographic white umbrella
in front of the light to diffuse it.

Back Light
The back light is behind the model and lights from the rear.
Rather than providing direct lighting (like the key and fill), its purpose is
really to provide definition and subtle highlights around the model's outlines.
This helps separate them from the background and gives a three-dimensional
look.
So that’s the standard three-light set up. If you need to, you can get away with fewer
lights. If you use only one light, it
should be set up as the key. If you use
two lights, one should be the key and the other should be either the fill or
the backlight. Experiment with what
looks best.

Other resources:
http://www.youtube.com/watch?v=Q9DSOxGLjhA&feature=fvwrel
http://www.bksstudio.com/what-you-will-need/proper-lighting/ (warning this is a studio -- they aren't your friends)
http://amanda36c.wordpress.com
(the images with black backgrounds are clips are taken from these videos. And below is a screenshot of someone with the best lighting I've seen on streamate.)

No comments:
Post a Comment